Thursday, May 10, 2012

Addicted? ...and an update

Quite possibly... there is just nothing like making a quilt! Yes it's greens and greys again. I might have a bit of a green and grey thing going on right now.
 I've been wanting to do a stacked coin quilt for a while... I didn't realize you could vary the sizes of the coins... well I guess you can do anything you want to right? It took me a little bit to decided on a pattern for these fabrics I wanted them to be larger so you could really see the fabric. They're by Premier prints, Birch Fabrics and Monaluna. With some Michael Miller TaDot thrown in on the front and for the backing. The binding is Kona Cotton Lime. 
Yummy polka Dots... there is a mini version I just finished and I will try to get pictures of soon... it's for the shop!
Meanwhile this ones for the living room this one has already been put to some serious use! 

And just to update everyone still no baby----9 more days until my due date... blahhh... but it's actually a VERY, VERY good thing because Micah got sick last week and has proceeded to infect the rest of us with the worst sickness we've seen in over a decade... no joke... so sorry if we are a little slow with the posting or seem a little off...because we are! Mum and Dad are hopefully on the mend now and once they're better we will be more then happy to have Bella make an appearance! Don't worry we will keep you updated!


Sunday, May 6, 2012

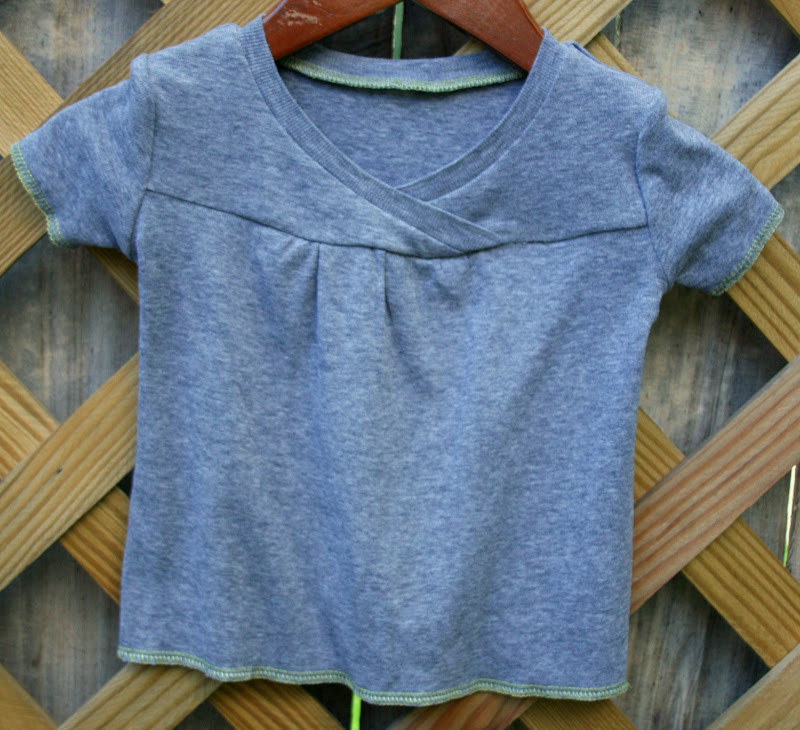
Hopscotch Top - Oliver + S

 When we found out that Jess and Uber's second was going to be a girl I decided it was about time to try the  Hopscotch Top by Oliver + S. I'd been looking at tops others have made for quite awhile, you'll find tons of inspiration if you go to that link. I was using my serger for the first time and didn't want to ruin the fabric Jess bought so I started with a soft old t-shirt of mine that had holes in it. I was able to avoid the holes and get a  6 months size. There were a few learning issues between me and the serger, so I'm glad I made that decision. The pattern is easy to follow and I was really happy with the way it turned out. Since it was my first try, with fabric I am not sure that will last too long, I decided to leave the hems with just a serged finish.
I picked out some fabric on Fabric.com and Jess ordered a yard which ended up being almost a yard and a quarter.  
I was able to get three dresses from 6 - 24 months.
If Jess decides she would rather them be tops, I can shorten them.
I simply love this pattern and can see making many more..... maybe I already have......


Friday, May 4, 2012

A whole lotta' Sheets

I really thought about dumping this project on Mum... But I was good and finally sat down and did it myself. Mum and I found two different sheet sets for cheap (clearance) at Target over the last few years, we originally just bought them for the fabric so we bought them in the largest sizes possible. After making Micah's turtle quilt I realized they would match really well when  he moved up into a real bed so I ended up setting them aside 
 Well he has officially been in his bed now for a few weeks, and they finally became a priority. I don't really see a need for a flat sheet on a kid's bed so I ended up with 4 fitted sheets and 4 additional pillow cases (some of which are miniature). Eventually we may need the trundle under his bed and I will have matching fitted sheets for the top and bottom mattress. I do have to say, these fit so much better than ones you buy off a shelf- it's ridiculous actually, because I was totally winging it. Isabella won't allow me to bend, I can't make his bed right now and Uber was at work. I just measured and hoped for the best. 
Sleeping babies are seriously one of the cutest things ever.

Wednesday, May 2, 2012

Art Board Tutorial

I just thought I would give you guys a brief run down/source list on how we made the Art Board in Micah's room.... just in case anyone wants to make one of their own.
I thought this project up when we were in the process of moving and had this huge 4'x8' pegboard that once hung in our garage. We either needed to store or get rid it, as we don't have a garage in our new place. Really it was just too nice of a piece to get rid of. Uber made it with molding that I can't seem to locate more of - it's basically a picture frame molding that used to be sold at building supply stores... not sure what it's called or why no one here seems to carry it any longer. 
Mom bought the Martha Stewart Organizing Magazine to get us ready for spring ... and my move... and in it her people used a peg board in a kids bathroom which made me think how awesome it would be in a kids room.    
So we started with this already built frame. 

From Ikea we picked up:
The shelf - EKBY JÄRPEN/ EKBY BJÄRNUM - in the 7 1/2" depth
Bins - RATIONELL
Rail- GRUNDTAL
Paper - MÅLA

I just played with the heights for these until I was happy with the placement. Then we centered them and used toggle bolts to hold the the shelf and rail in place. 
The Grundtal Rail has screws on the ends of the bar so when the paper needs to be replaced we can just undo those and slide on a new roll. 
The bins are all held on by small pegboard hooks- this way they can be rearranged in the future if the supplies being stored need more space. 
The sheet metal was a bit more tricky- home improvement stores didn't carry a large enough piece so luckily Mum deals with First Coast Sheet Metal (no website but you could look them up if your local. I would recommend them) through work, so she ordered a custom piece cut to the exact size I needed with rolled edges- I am sure you could just look up a company in the phone book and have the same thing done. It was relatively inexpensive - around $40 which if you price out the smaller pieces sold in Home Depot or Lowes you would be up over that price and would still have to figure out how to cut it yourself.

I'm sure they could have drilled holes for us but I am not that on my game so Uber had to do it when I got the metal home and marked the back. 

He used a nail punch to dent the metal where he would be drilling
And then slowly gauged up with the drill bits 
The tear bar is a short piece of aluminum that I found in the metal section at Lowes.
The sheet metal and tear bar were all secured with a bolt on the front and a washer and nut on the back. 
The sheet metal serves a couple of purposes- smooth drawing surface, magnet board and can also be used as a white board. 
I used my silhouette machine to make these chalkboard vinyl labels (since I had vinyl on hand from the stair numbers) but Martha Stewart sells the same thing at Staples. I used a chalk pin to write on the labels so they can be redone in the future.

 And of course don't forget to secure the board to the wall so you don't have to worry about it falling over on anyone. We have ours leaning too - the bottom is about 6 inches out from the wall. 
I can not express to you how much I LOVE this project. It's really fun and I think it will grow with him. I have all sort of fun ideas for magnets!!
And no post about the boys room is complete without a picture of the boy himself- his dad taught him how the drill works.... not really something I appreciate....he is crazy about tools
Should an 19 month old be able to lift a drill? 
Well he can and he is very proud of himself.