Showing posts sorted by date for query garage. Sort by relevance Show all posts

Tuesday, February 26, 2013

Crafting for Uber - Bike Bag

Uber bikes almost every weekend. When we had a garage he had a spot to stash all of the paraphernalia that comes with riding. Now that were in a condo it all seemed to be spread from my parents house through both of our vehicles and in random places around our house. This was super frustrating-not only for me but also for Uber because he constantly didn't have things he thought he did. 
So I made him a present- a Gear Bag.  
of course it had to be pretty- but also masculine. I'd been hoarding this wood grain fabric forever

The bag is fully lined, drawstring closure, squared bottom
I cut the bike out and steam-a-seamed it on. Then stitched around it rather crudely. The spokes still have bits of paper in them since I used paper to guide where I should sew the spokes. 
He really likes it which is a relief. It gets constant use. I think its around 15" x 20" big enough to fit biking shoes, helmet, glasses, camel pack and other various riding gear. And bonus for me I love looking at it and it hangs on the inside of our laundry room door. 


Wednesday, May 2, 2012

Art Board Tutorial

I just thought I would give you guys a brief run down/source list on how we made the Art Board in Micah's room.... just in case anyone wants to make one of their own.
I thought this project up when we were in the process of moving and had this huge 4'x8' pegboard that once hung in our garage. We either needed to store or get rid it, as we don't have a garage in our new place. Really it was just too nice of a piece to get rid of. Uber made it with molding that I can't seem to locate more of - it's basically a picture frame molding that used to be sold at building supply stores... not sure what it's called or why no one here seems to carry it any longer. 
Mom bought the Martha Stewart Organizing Magazine to get us ready for spring ... and my move... and in it her people used a peg board in a kids bathroom which made me think how awesome it would be in a kids room.    
So we started with this already built frame. 

From Ikea we picked up:
The shelf - EKBY JÄRPEN/ EKBY BJÄRNUM - in the 7 1/2" depth
Bins - RATIONELL
Rail- GRUNDTAL
Paper - MÅLA

I just played with the heights for these until I was happy with the placement. Then we centered them and used toggle bolts to hold the the shelf and rail in place. 
The Grundtal Rail has screws on the ends of the bar so when the paper needs to be replaced we can just undo those and slide on a new roll. 
The bins are all held on by small pegboard hooks- this way they can be rearranged in the future if the supplies being stored need more space. 
The sheet metal was a bit more tricky- home improvement stores didn't carry a large enough piece so luckily Mum deals with First Coast Sheet Metal (no website but you could look them up if your local. I would recommend them) through work, so she ordered a custom piece cut to the exact size I needed with rolled edges- I am sure you could just look up a company in the phone book and have the same thing done. It was relatively inexpensive - around $40 which if you price out the smaller pieces sold in Home Depot or Lowes you would be up over that price and would still have to figure out how to cut it yourself.

I'm sure they could have drilled holes for us but I am not that on my game so Uber had to do it when I got the metal home and marked the back. 

He used a nail punch to dent the metal where he would be drilling
And then slowly gauged up with the drill bits 
The tear bar is a short piece of aluminum that I found in the metal section at Lowes.
The sheet metal and tear bar were all secured with a bolt on the front and a washer and nut on the back. 
The sheet metal serves a couple of purposes- smooth drawing surface, magnet board and can also be used as a white board. 
I used my silhouette machine to make these chalkboard vinyl labels (since I had vinyl on hand from the stair numbers) but Martha Stewart sells the same thing at Staples. I used a chalk pin to write on the labels so they can be redone in the future.

 And of course don't forget to secure the board to the wall so you don't have to worry about it falling over on anyone. We have ours leaning too - the bottom is about 6 inches out from the wall. 
I can not express to you how much I LOVE this project. It's really fun and I think it will grow with him. I have all sort of fun ideas for magnets!!
And no post about the boys room is complete without a picture of the boy himself- his dad taught him how the drill works.... not really something I appreciate....he is crazy about tools
Should an 19 month old be able to lift a drill? 
Well he can and he is very proud of himself.

Wednesday, August 17, 2011

Uber's crafty

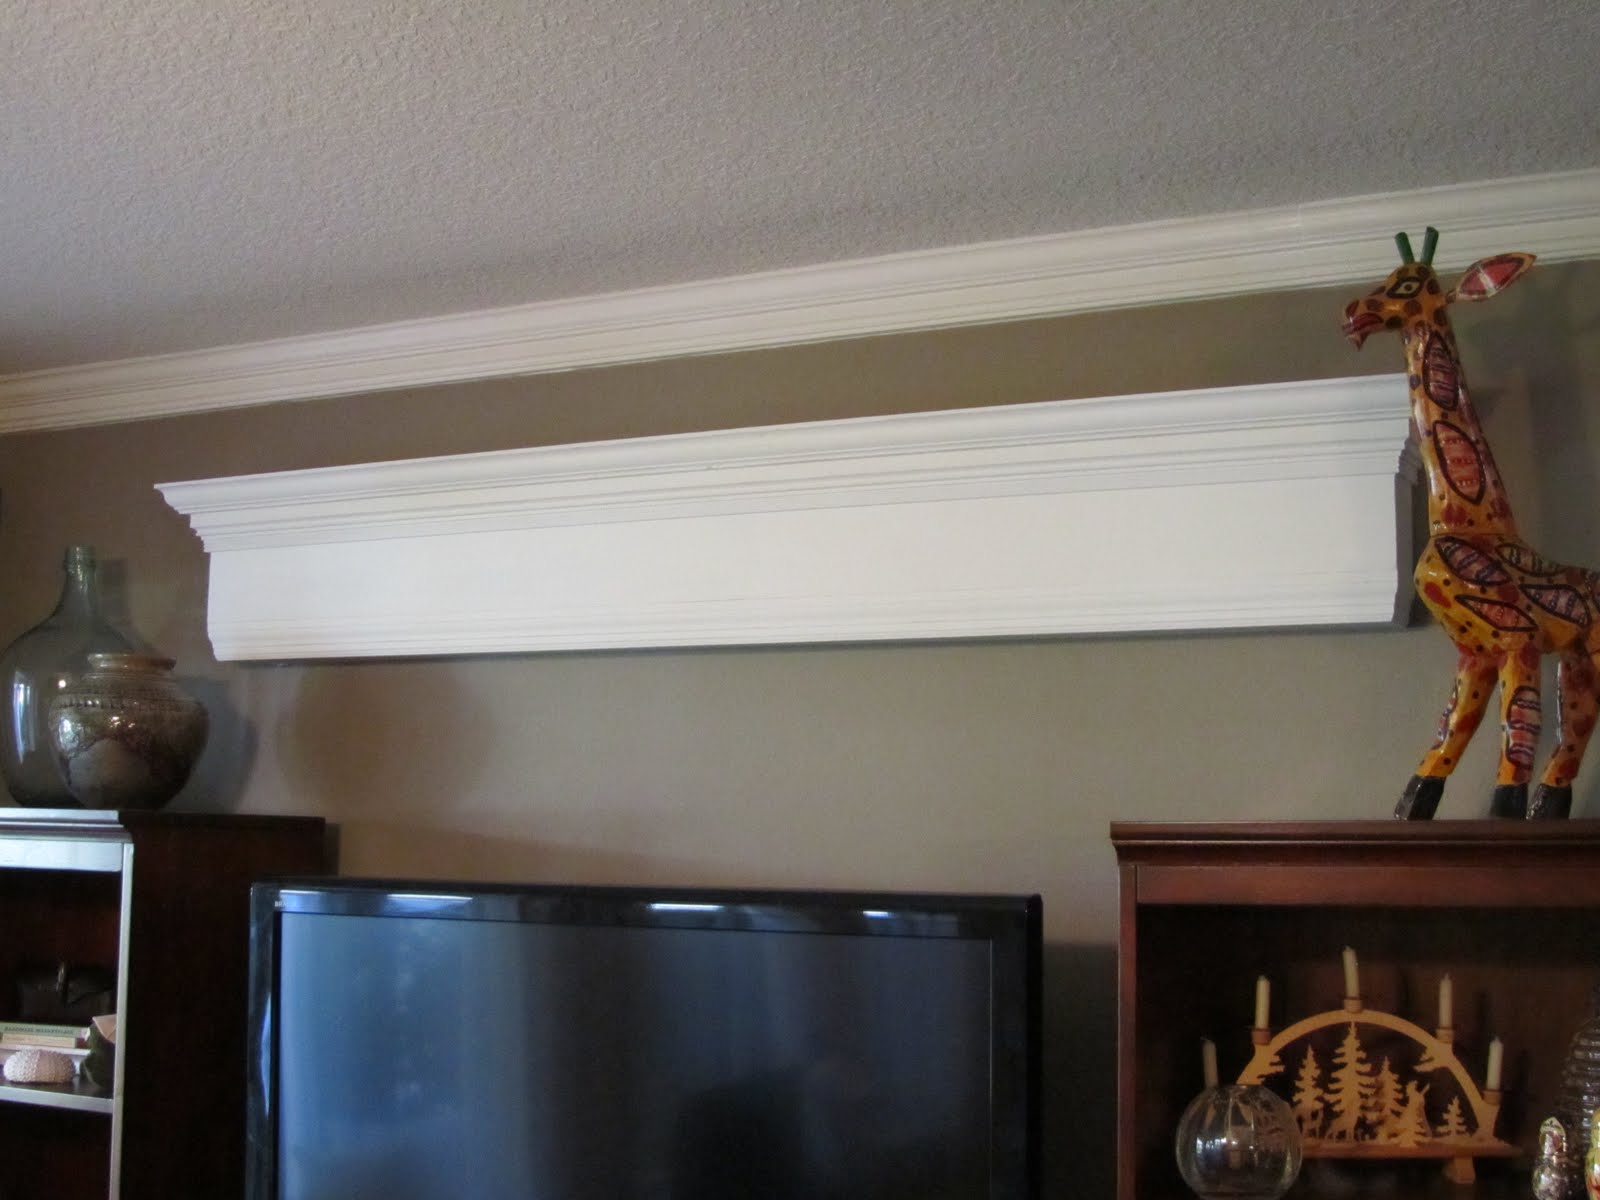
This wall has been bothering me forever.  It's very frustrating to have all of your furniture purchased and still feel like your space looks unfinished. We have 9 ft ceilings in our downstairs and something was needed above the TV. 
I had saved a few images for inspiration-  (sorry I don't know where the top one is from) 
  And asked Uber super nicely if he would build me something, lucky we had a bunch of scrap molding in the garage from old projects so this was a great way to clear some of it out. I think this project ended up costing about $9.  
 Here it is close up. I did distress it ... but apparently not enough to really show. What made it even better was the next Pottery Barn catalog I received in the mail had this $400 version which seems a little ridiculous to me but I was super happy to show it to Uber so he could see what an awesome job he did.
 And here is the wall as it looks now. We raised the TV up about 5 inches since we both had never been happy with the height and I switched out the picture for this mirror.
 I'm not done accessorizing yet but I'm slowly working on it. The giraffe by the way is Ubers gift to Micah from a recent trip to Central America.
I have a bunch more house projects to show you so stay tuned!

Saturday, August 28, 2010

On The Other Side

Our pack out was exhausting but not bad as far as pack outs go. We were able to clean the apartment as space cleared which meant by Friday we were done. There were some last minute touch and go items that I wasn't sure we'd finish. There were some things I completely forgot. By Friday night we were ready to relax and try to enjoy our last two full days in Germany. 


I decided we should try out the V8 motel in Boeblingen. It was hilarious. We I chose one of the novelty rooms. It was comfortable, quiet and fun.


The next day we hopped on the train and made our way down to the Bodensee. We took the ferry from Friedrickshafen to Meersburg only to find out we were there on the busiest weekend of the year. After three and a half hours of walking and one more ferry ride into Konstanz we finally found a place to sleep, quite possibly the last room available. It was 9:30pm, the kitchen was closed, and we were hungry. We asked the waiter if he could make us a sandwich he asked if we liked fish and said the chef would not mind making us a plate. In other words, excellent customer service beyond our expectations and the food was fantastic.


A fun garage over looking the water
My dream home


The next morning we walked to Mainau and saw some gorgeous scenes. 


That night we were back in Stuttgart at the Movenpick, another absolutely wonderful hotel. It's right across from the airport so it's very convenient.
Kelly came the next morning to have breakfast with us, see us off and help us schlep our ridiculous amount of baggage (all essential, really) to the airport. So ends our time in Germany. When are you all coming to see me here?


Tuesday, July 6, 2010

Consolidating

Since I've been back I have started the process of consolidating the office and guest room down into one room so that I can start getting the nursery together - I only have 99 more days until my due date! I can't believe that it's approaching quite so quickly my to do list is a mile long... not that it all has to be done before the baby arrives - but it sure would be nice!

The Guest Room and Office are for the most part completely unused spaces for us. I did the bare minimum for each room knowing that in the future we would be purging most of the stuff in them to make room for kids. Below is the before picture of the guest bedroom corner/closet that is now going to house our home office. We actually just bought the desk a few months ago it's been completely bare in this corner for the last 4 years.
After some slight reworking of my original plan here's what we ended up with.
The details--
Desk - Is from World Market, I chose this one because it was reasonably priced, solid wood, and on the small but not too small side.
Shelf - Is from Ikea I put little feet on the bottom of the shelf to allow it to sit closer to the wall.
Storage containers -
The aluminum storage bins are in the heavy duty garage storage at Lowe's, they are slightly to long for the shelving unit, but since it's in a closet I just kept it about an inch from the wall and it worked out perfectly.
Ribbon and paper storage are from Michael's
Magazine storage is from Ikea
Floating shelf - from Lowe's. Originally it was black I painted it white.
I'm really happy with the way that it turned out! I have some finishing touches and things I would still like to do in here but it's completed for the time being... the nursery sounds like a lot more fun to work on! The crib and chair have been ordered so I will start making final decisions on the the nursery soon!

Saturday, May 30, 2009

Cause we are CRAZY....

So here's my garden. Previously all my plants were in the ground but this last winter we had so many freezes (and I forgot to cover them... oops) that all the plants but my jasmine died. So I moved them all to containers when I replaced them. It has worked out to be so much nicer in my small space since I can just move them when they grown too large for their spot.
unfortunately the bark has been driving me up a wall it tracks in to the porch area, looks messy and seems to get all sorts of garbage stuck in it...plus the bugs that crawl in it ... gag!

I also hate that the grill takes up one whole side of our small planting area. It's a large black sun blocking blob. We got a huge grill when we moved in thinking we would have all sorts of gatherings ... unfortunately that hasn't really panned out. I think we will be replacing it next year with a smaller one that we can keep in the garage (Florida humidity eats grills so this not cheap grill is already biting the dust) I am really thinking about making a list of all the things people who are moving to Florida need to know about Florida... I just thought people grilling outside their garage was hick-ish... Now I know keeping you grill inside keeps it from rotting.
So Uber finally gave into my pleading to do something about it and we got to work Friday. We cleared the mulch (reusing it in the beds behind our house) and Uber broke up the ground and got it all leveled out. We had to carry all of the extra dirt (actually clay) out by hand and dump it in some sand dunes near our house.
I carried all of these bricks... 340... from the truck... which wasn't close uber estimates it was a good 75 feet away.
Saturday we got up early to beat as much of the heat as we could and got to work.
I decided on a herring bone pattern. But turned on its side so there wouldn't be any diagonal cutting. Uber was very worried when I laid it out the first time on a diagonal... I was just trying to figure out the correct pattern.
The sides were too small for the pattern so we just laid it staggered.
Halving the bricks.
Here's me laying my half. I would say we split the work evenly on this project... which is saying a lot because normally Uber does most of the heavy work.
Uber doing the final sweep with sand.
I can't tell you how thrilled I am about this. I really wish it could be seen from inside the house.
Pavering around the corner allowed us to tuck the grill along the side. I love how you can tell how much space we have out here now. Before it looked so crowded.
It took us roughly 7 hours to get about 70 sq feet laid.... I think it was totally worth it... though we are both completely exhausted.
I think I may make this picture my screen saver I like it so much. Did I mention everything worked out perfectly with the pavers in the pattern I wanted? I could not believe our luck we started in the front left corner and it all laid out perfectly we only had to cut 4 bricks to fit in a few of the tighter spaces... this is of course not including all the halved ones... which there were only about 15 of, which is still not bad.
Uber finally picked all of my cherry tomatoes for me... I can only reach the ones on the bottom...
then he made me this snack... yum!

Hope you all had a good weekend. Im off to try a finish another project I have going... I have this list of old project that I was supposed to get done before Mum and Dad get here NEXT WEEK but I dont think it is all going to happen... oh well!
P.S. This is my hundreth post!! I wanted to have a give away but it just isn't going to happen right now... Hopefully soon though.